Wednesday 30 November 2011

Heatless curls = result

So, one piece of advice.

1- if you have short hair, use wider strips of paper, or dont keep them in too long.

Here's a quick update with how my hair turned out using the heatless curls:

Keep in mind, it did start out looking like this: 


Haha, ridonkulus, I know.
I just brushed the curls out until they were softer and less...springy.


Like I said, if you have longer hair this will give you perfect Taylor Swift-esque curls, but because I have shorter hair and an afro doesn't really suit me, I brushed them out and now its super volumous like this:


And I loooove me some big hair!

So, if you want a heatless alternative to super curly hair, try this out! It definitely works!

Love, S

Conditioned plumped up lips!

Just because the cold weather is giving us all chapped lips, doesn't mean we have to chuck away our bright lipsticks!

Fight the chaps with a home-made lip scrub that's SUPER hydrating and yummy!

I mixed this up together tonight because recently my lips have always been getting dry and flaky regardless of how much water I drink.

In the spirit of the upcoming Christmas season, I've mixed up the ingredients that will make the scrub taste and smell just like minty candy canes! Mmm!

NOTE: Excuse the crappy photo quality. I was using my Blackberry because my sister was sleeping already and my camera was in her room.


Start off with a few spoons of a salt/sugar mix. For this recipe I'm making it jumbo portioned because I didn't have any smaller jars. I always measure the ingredients out by eye, so if you're making this for just yourself, cut down the portions by 3/4's.

Again, start off with a mixture (70/30) of sugar and salt respectively. I used fine grain.
This is great for exfoliating the lips and keeping them soft and plump.

Then, add a few spoons of extra virgin olive oil (or coconut oil, depending on your preferance).
Again, if you're making a smaller portion, cut down the servings.

Mix THOROUGHLY together.

Then add cayenne chili powder, cinammon, sweet paprika powder into the mixture.
Again, I added everything in by eye. I added the cinammon for the smell and the chili and paprika is for helping blood circulation flow to the lips (and plumping).

REMEMBER NOT TO TOUCH YOUR EYES AFTER HANDLING CHILI POWDER


Once that's added in, spoon in some honey (or a teeny bit of molasses) and mix well together.

Finally, the finishing ingredient: Peppermint essential oil!
This gives the scrub a DELICIOUS and very Xmas-y smell and taste.

For the jar I had I used about 7 drops.

Mix everything VERY WELL together until it congeals into an almost clumpy mixture of goodness.


Take about a half-teaspoon of it onto your palm and with your finger, scrub your lips until you can feel the tingly sensation. I know it might taste pretty good, but DO NOT EAT YOUR SCRUB!

After you rinse it off, apply your favourite BALM (NOT LIPGLOSS), and let it set in before you apply your favourite lipstick. Or just keep applying lip balm if you're going for a more natural look.


Enjoy your lovely plumped up and conditioned lips!!

Love, S

Recycled curls?

Now that winter is settling in, we tend to use way too much heat on our hair.
Leaving the house with damp locks is completely out of the question. Especially for those who live in or around Europe where the temp is dropping down down down!

Lately I've been blowdrying my hair after every shower. That means about 45 mins of hot air every day! It's taken a big toll on my hair, causing oilyness, itchy scalps, and split ends.
(img from google.com)

Thankfully, there are ways to style your hair WITHOUT heat while at the same time RECYCLING!

Yup, smack me on the bum and call me Sally, it's true.

This technique is really good for those who want to curl their hair naturally without damaging it with too much heat, while at the same time using up those paper bags you have piled up in your bottom kitchen drawer.

Since I want a bit of a change from the usual straightened hair, I'm going to show you how I used the paper bag technique to get soft bouncy curls without the use of a curling iron.

Not to mention, the idea of any heat/steam kinda puts me off since I just recently got a nasty burn on my left arm from a bad cooking incident:

Yup. It's slowly getting better. I'm slathering it with aloe vera. Ick.

ANYWHO. I'm going to start off by tearing (or cutting) up some paper bags. I had an old Zara bag that did just fine:


Just about an inch thick and a few inches lengwise should be fine.

The thickness of the paper basically determines the curl style (wavy or tight curls).
Your hair should be DAMP, not wet, otherwise the paper will just disintegrate and become useless.

[Quick note: My mom just walked past and asked me what I was doing. "Heatless curls, mom" I said.
"HITLER'S CURLS?!" she replied. Needless to say, that gave us a good laugh!]
.
.
.
.
.
I just finished tying up all of my hair. Took me about 50 minutes (I have medium/short and long hair in layers) 


                                   ^^^^ View from the top ^^^^


Once you've done that, you have to wait at least 4-6 hours (or just overnight like I'm doing it) for your hair to completely dry and form into the curls.

IF you're in a hurry, just use your hair dryer on a VERY LOW heat setting, or on cold blast, and dry up your locks.

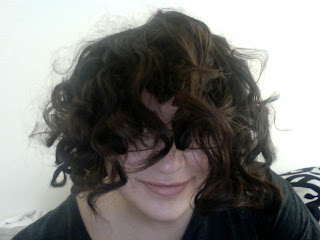
Once they're dry and ready to be taken off, CAREFULLY untie them and roll downwards.
Apply a serum or mousse to plump up and style the curls to your liking.

I'll be uploading the pics to my curled hair in about 5 hours (when I'll be getting ready for uni) so you can see the finished result.

Let me know if you have any techniques that recycle household items for your beauty regime.

Lots of love and quiches
xx S

Wednesday 9 November 2011

Eye see what you did there.

Eyebrows: they're one of the most underrated features of the face, yet one of the most important.

Our eyebrows are the key features that can frame our face. Making sure to keep them in check can ensure that even if you don't have any make up on, you'll look fresh, clean, and put together.

A new trend that has been hitting the catwalks this year has been bold, thick eyebrows.
Playing with masculine aspects while still maintaining a feminine look can be achieved very easily.


Note that thick, dark, eyebrows don't always suit everyone's facial structure and complexion. If it doesn't suit you, try playing it down and making it look more natural by using a lighter shade of shadow or pencil to fill them in.

I have dark hair and eyes and light skin, and my eyebrows are naturally thicker. However, I filled them in (concentrating on the inner half where my hairs are more sparse) and accentuated the arch.

Because this look is such a strong factor, play down the eyes and stick to a more natural tone. Maybe a layer of nude/light brown/gold eyeshadow all over the lid and then a few thick coats of mascara.

I love pairing plain eyes with a BOLD lip, and when put together with the strong brows, it has a strong, sexy look that is still very feminine. If you want the overall look to be very clean, sharp and smart, you should tie your hair up in a ponytail or a tight braid.

To show you the look, I paired the bold eyebrows with a dark-wine coloured lipstick. I applied a light gold all over my eyelid and swiped on a few coats of mascara.


Paired with a blazer, it can be a really smart look for the office.

HOWEVER! This look doesn't have to be only for a strong, masculine approach. You can play with other features (such as your hair) to acheive a glamorous look, along the lines of Jennifer Connelly's look:


Personally I wouldn't darken my eyebrows to the point where it's REALLY obvious that they're fake. Maybe for a photoshoot for editorials, but that's about it.
As you can see I just darkened my natural hairs with some black eyeshadow, just enough to make them a little stronger.

Would you wear this look? And if yes, how, when, and where would you wear it?

Love x

Sunday 6 November 2011

Cleo Eyes

As promised, a remake of the Cleopatra / Egyptian eyes.


This look is perfect for a night out. The use of golds, browns, blues, and blacks all play off to be sexy and classic without being over the top. However, that doesn't stop it from being a real eye-catcher!

In the black and white picture, I applied a dark-wine coloured lipstick to play off the liner on the eyes.

This look goes especially well with thick, arched eyebrows. I slightly exaggerated my arch with a little powder and an angled brush, but I wanted to keep them looking natural as possible.

List of products used:
MAC eyeshadow in Amber Lights - eyelid until creaseline.
INGLOT black gel liner- heavy cat eyeliner with inner eye flick and bottom liner + waterline.
INGLOT Soft precision liner 35 (gold) - used as a base for the eyeshadow, on bottom half of lid.
INGLOT Chocolate brown (pearl) eyeshadow - outer V and creaseline.
INGLOT Bronzer - scuplted high cheekbones
CLINIQUE High Impact mascara (2 coats, top and bottom).
BOUJOIS Metallise metallic eyeliner 54 Blue clinquant (aqua liner)- bottom liner.
BOBBI BROWN Shimmer Brick (Bronze) -Cheek and eyebrow highlights; accents on the eyelid.


No foundation of concealer was needed (but if you need some, or are wearing this out and want it to last longer, go ahead).

For the lips I just dabbed some of the BOBBI BROWN shimmer brick and coated it with Burt's Bees lip balm to add a teensy bit of shine.

More looks will be coming soon.

------------------------------------------------------------------------------------

As for the youtube account, I have taken down the uploaded tutorials and I have decided to not post any video tutorials until the future. The reasons being mainly that the quality of the camera isn't up to par, and my video editing skills aren't the best. I'm also not so comfortable having videos of myself up on youtube just yet. I guess it takes time getting used to the idea.

SO, until I master the editing and get a better HD camera, I'll be sticking to images for now :)

Thanks for all of you who keep motivating me. Y'all are the bestestest <3

Love x

Many many posts.

So I've been drafting a ton of blog posts for various reasons.
Most of which that I'm slightly anal and a bit of a perfectionist that unless I really think it's worth posting, I wouldn't publish it.

So for now, until inspiration hits me and my Genie of Genius swoops in and hits me with some new topics to share, I'll be posting up various make up looks that a bunch of you have been requesting but I've yet to post.

The first will be an alteration of a previous look I've done. It was inspired by the colours of ancient Egyptian make up (golds, browns, turquoises, and of course, black!).

Here's a picture of the previous look:

Now excuse moi while I go finish up the rest of the looks :)
(also an explanation about the whole YOUTUBE video tutorials will come up too)

Love x